Tuesday, 30 June 2009

Colour a black and white image

In this Photoshop tutorial you will learn how to colour a black and white image. This process involves using the brush tool to paint over the areas where you want colour. If you were to do this, the detailing in the image would disappear. To keep the detail you need to apply the colour blending option. I have used a free stock image of a pomegranate which is available from: www.sxc.hu

Colour a black and white image

Step 1

Open your black and white image in Photoshop.
Set the image mode to RGB colour by selecting Image > Mode > RGB colour. This will allow you to paint colour on your black and white image.
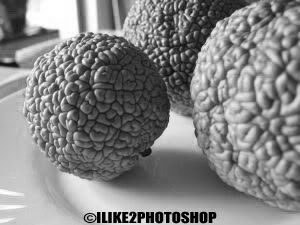


Step 2

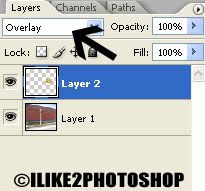
Insert a new layer Ctrl + Shift + N and then change the blending option to colour. This will maintain the detail when you paint colour to your image.
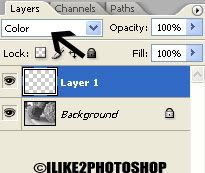


Step 3

Select the brush tool with an appropriate brush size and paint over the areas where you want colour. I have used #35610f colour but you can use whatever colour you wish.


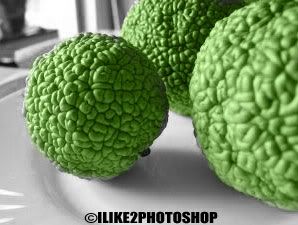
You should now have colour on your black and white image. If you wish to fill the whole image with colour, simply change the colour of the brush and paint the rest of the image.

Wednesday, 24 June 2009

Spiky sphere

This Photoshop tutorial will teach you how to create a simple spiky sphere. You are required to use the extrude filter for this effect. The results of this tutorial look like a spiky/thorny ball.

Spiky sphere

Step 1

Open a new Photoshop document with 640 x 480 dimensions.
Take the paint bucket tool and fill the background colour black.
Select the elliptical marquee tool and drag a circle shape like below:


Step 2

Select any colour you wish and fill in your marquee with the paint bucket tool. I have selected #13b5ea colour. Now deselect the elliptical marquee Ctrl + D and your image should look like below:


Step 3

Select Filter > Stylize > Extrude and add the following settings:

  • Type: Pyramids
  • Size: 15 Pixels
  • Depth: 255 Random


Step 4

To increase the size of the spikes choose Ctrl + F to repeat the effect. If you wish to change the colour of the Spiky sphere, select Image > Adjustment > Hue/Saturation and adjust the hue slider.


You should now have thorny ball effect.

Sunday, 21 June 2009

Wood texture effect 2

This is another method for creating a wood texture effect in Photoshop. This time only the fibers filter is needed for this wood effect.

Wood texture effect 2

Step 1

Open a new Photoshop document with 640 x 480 dimensions.
Choose a light brown colour for the foreground colour and a dark brown colour for the background colour. I have used #8a6338 for the foreground and #5f3912 the background colour, but you can use whatever colours you wish.


Step 2

Select Filter > Render > Fibers and add the following settings below:


I have selected 30 for the variance and 8 for the strength.


Step 3 – optional

If you don’t like the colour of your wood texture, you can select Image > Adjustments > Hue/Saturation. Then adjust the saturation texture to your liking.


You should now have wood texture.

Friday, 19 June 2009

Text outline effect

This Photoshop tutorial will teach you how to create a simple text outline effect. You are required to use the stroke blending option for this effect.

Text outline effect

Step 1

Open a new Photoshop document with the size 640 x 480.
Select the text tool with a black colour and type your message on canvas. I have used impact font type, but you can use whatever font you wish.


Step 2

Select Layer > Layer Styles > Blending options. Then drag the “this layer” of the Blend If section, until your text on the canvas disappears.


Step 3

Now select the Stroke blending option and add the following settings:

Size: 3px
Position: Outside
Blend Mode: Normal
Opacity: 100%
Fill Type: Colour
Colour: # 1663ef (Choose whatever colour you wish)


You should now have text outline effect.


Related Tutorials
Glow text effect
Ice text effect
Jelly text effect
Gold text effect

Wednesday, 17 June 2009

Eye shadow in Photoshop

This Photoshop tutorial will teach you how to add eye shadow in to an image. You need to use the paint brush tool for this effect. I have used a free stock image of a woman which is available from: www.sxc.hu

Add eye shadow

Step 1

Open an image in Photoshop.


Step 2

Insert a new layer by selecting Ctrl + Shift + N.
Select the brush tool with an appropriate brush size and choose the colour you wish to use for the eye shadow. I have used #c64efd colour but you can use whatever colour you wish.
Change the brush opacity to 40%.


Step 3

Paint over the areas where you want eye shadows like below. If your eye shadow colour is too light, you can paint another layer on top of your current layer.


Step 4 - optional

Select the smudge tool and blend in the eye shadow colour by clicking and dragging the mouse.


You should now be able to add eye shadow colour.


Related Tutorials
Change eye colour
Black eye effect

Tutorials

Welcome to my Photoshop tutorial blog. I have provided a list below of all the tutorials available to my blog. Feel free to leave any comments or suggestions, also remember to subscribe. Some older tutorials have been removed from this list, so use the search bar on the right to find all the tutorials.

Basic


Photo Editing

Photo retouch

Special effect

Text effects

Texture

Tuesday, 16 June 2009

Image on wall

This Photoshop tutorial will teach you how to add a sign or logo to a wall. In this tutorial I have used a logo of a lion and an image of a brick wall. The effect gives the illusion of the logo being overlaid on the wall. The images I have used are available free at: www.sxu.hu

Image on wall

Step 1

Open an image of a wall and an image your wish to superimpose.
Remove the background from the logo image, so that the logo has a transparent background.


Step 2

Select your logo (Ctrl + A) then copy it (Ctrl + C) and paste it (Ctrl + V) on your wall image.
Your image should look something like below:


Step 3

Select the free transform tool (Ctrl + T) and resize the logo to your desired size.
Now select the perspective tool by choosing Edit > Transform > Perspective and adjust the handles to the right pespective. Be sure to take some time when using the perspective tool to make it look correct.


Step 4

Change the blending option to Overlay.


You should now have an image on a wall.

Thursday, 11 June 2009

Free image hosting

Image hosting is essentially a service which allows you to upload images on the internet website. The hosting is useful for variety of reasons such as sharing on blogs, email, Ebay and on forums. Since, the hosted images are on the internet they can be accessed anywhere in the world and on any computer. This can be very useful when you need access to your images on someone else computer.

However, a drawback of using free image hosting is the longevity of the websites. These websites occasionally vanish, due to financial reasons. This means all your hosted images will vanish along with the website. Another drawback of free image hosting is the amount adverts on the website, but this is expected as the websites need to generate revenue for providing a free service.

There are many different places on the internet that offer free image hosting. I have listed some of the free image hosting site below:

1. Photobucket

Photobucket offers image hosting, free photo sharing and video sharing.

2. Flicker

Flickr is almost certainly the best online photo management and sharing application in the world.

3. Tinypic

Tinypic is a photo and video sharing service that allows you to easily upload, link and share your images and videos

4. Pict

Free image hosting, picture hosting and photo sharing at Pict. Upload multiple images, resize photos, create albums, share your photos and much more.

5. Pictiger

Free image and flash hosting with various resizing, cropping, filtering and layout options. 1MB file size limit, no transfer limit specified.

6. Imageshack

ImageShack uses a highly reliable dedicated Linux server network to provide its digital content hosting service.


Glow text effect

This Photoshop tutorial will teach you how to create a glow text effect. The outer glow and stroke blending options are needed for this tutorial.

Glow text effect

Step 1

Open a new Photoshop document with 640 x 480 dimensions.
Select the paint bucket tool and fill the background in a black colour. Then select the text tool and type your message on the stage. I have used Myriad pro font type with white colour, but you can use whatever font and colour you wish.


Step 2

Select Layer > Layer Style > Blending options. Check the outer glow checkbox and add the following settings.
For the structure: the blend mode is screen, the opacity is 100% and the colour is #D52603.
For the elements: the techniques: softer, the spread is 8% and the size is 7px.


Step 3

Now check the stroke checkbox and add the following settings.
For the structure: the size is 2, the position is center, the opacity is 100% and the colour is #851212.


**Depending on your size of your text, you may need to adjust the glow and stroke blending options.


You should now have a glow text effect.


Related Tutorials
Jelly text effect
Gold text effect
Flame text effect

Tuesday, 9 June 2009

Tile effect

This Photoshop tutorial will teach you how to create a simple tile effect with your image. You are required to use the tile filter for this effect. This tutorial only requires 2 steps. I have used a free stock image from: www.sxc.hu

Tile effect

Step 1

Open an image in Photoshop.
Reset the colour palette by pressing the “D” key.


Step 2

Select Filter > Stylize > Tiles and add the following settings:

Number of tiles: 10
Maximun Offset: 2
Fill Empty Area with: Background colour


You can experiment with the various setting if you wish.


You should now have a tile effect,

Sunday, 7 June 2009

Abstract water texture

This Photoshop tutorial will teach you how to create an Abstract water texture. The result gives the effect similar to water. You are required to use the cloud filter and various other filters for this tutorial.

Abstract water texture


Step 1

Open a new Photoshop document with the size 800 x 600.
Reset the colour palette by pressing the “D” key.
Select Filter > Render > Clouds and your image should look like below:


Now select Filter > Render > Difference clouds.


Step 2

Select Filter > Sketch > Chrome. I have set the detail to 7 and the smoothness to 4, but you can experiment with your image.


Step 3

You now need to add colour to the texture. Select Image > Adjustment > Colour balance and add the following settings. I have set the colour levels to -3, +47 and +100 and set the tone balance to Midtones.


Step 4

Duplicate the layer by selecting Ctrl + J and change the blending option to “Multiply”. You can experiment with the other blending options if you wish.


Step 5

Your texture effect might look a little dark. Select Image > Adjustment > Brightness/Contrast change the brightness to 44 and the contrast to 37 and click ok.


You should now have an abstract water texture.

Thursday, 4 June 2009

Add image to TV 2

This is more examples of different electronic devices you could use from the add image to TV tutorial. I have used three electronic devices which are: a laptop, a cell phone and a handheld games console. You could potentially use any image of an electronic device that contains a screen. In this example I have used free stock images which can available at: www.sxc.hu

These are the images I used below:


These are the final result below:


The methods used to add the images to the electronic devices are exactly the same as the previous tutorial.

Monday, 1 June 2009

Smooth skin in Photoshop

This Photoshop tutorial will teach you how to create a smooth skin effect. The results will look like the smooth skin you see in magazine covers. This tutorial may take some time to complete depending on your image. Some knowledge of quick masks is needed in this tutorial. I have used a free stock image which is available at: www.sxc.hu

Smooth skin in Photoshop


Step 1

Open an image in Photoshop.
Duplicate the layer by selecting Ctrl + J.


Step 2

Take the Zoom tool (Z) and zoom in your image a couple of times.
Select the Spot healing brush tool with an appropriate brush size and paint over the spots and blemishes you see on the face.
You can also use the healing brush tool for this step. The healing brush tool is similar to the clone stamp tool, as you have to select a sample by holding down the Alt key, and then paint over the areas of the image. This tool is different from the clone stamp tool as it blends in with the surrounding areas.


Step 3


This step removes wrinkles from the image. Skip to the next step if your image has no wrinkles.
Select the patch tool and drag a selection around the area of wrinkles. Then move the selection to an area that contains no wrinkles. For more information checkout the remove wrinkles from image tutorial.


Step 4

Reset the colour palette by selecting the “D” key.
Select the brush tool with an appropriate brush size and select the “Q” key to enter quick mask mode. For more information on quick mask checkout the tutorial.

Now paint over the areas of face, but leave out the eyes, mouth, nostrils and eyebrows. You should get a red painted face like below:


**If you make a mistake you can use the eraser tool.


Step 5


Exit quick mask mode by selecting the “Q” key again. Then choose Select > Inverse. Your image should look like below:


Step 6


Select Filter > Blur > Gaussian Blur and choose 4 pixels for the radius the click ok. You may wish to experiment with radius in your image.


You should now have smoother skin on your image.


Related tutorials

Change hair colour

Whiter teeth

Change eye colour
Add lipstick
Increase nose size

  COPYRIGHT © 2010 · ILIKE2PHOTOSHOP · Theme by Ourblogtemplates

Back to TOP