3D text effect
This Photoshop tutorial will teach you how to create 3D text effect. This effect requires duplicating and moving several text layers to create the three dimensional effect.
3D text effect
Step 1
Create a new Photoshop document with 640 x 480 dimensions.
Select the text tool and type your message on the canvas. I used Impact font type, but you can use whatever font you wish. For this text effect, the blockier the font type the better. 
Step 2
Hold down Ctrl + Alt and select down and right on the keyboard about 15 – 20 times depending on the size of your text. You can also select: down & left, up & right or up & left on the key board if you wish.
You should notice a lot of new layers in your layers panel and your text should look like below: 
Step 3
On the layers panel hold down the Ctrl key and select all of your new layers apart from the top layer and select Ctrl + E to merge all the layers together. Your layer panel should look like below: 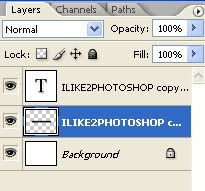
Step 4
On the layers panel select the top layer and right click and select Blending options. Then give your text some colour by checking either the colour overlay or the gradient overlay. I have selected the gradient overlay with an orange and yellow gradient.
Now check the Stroke style and give the size of 2 or 3 pixels and the colour black then click ok.
Step 5
On the layers panel angle select the merged layer then right click and select Blending options. Now check the drop shadow style with the default settings and click ok.
You should now have a 3D text effect.
Related tutorials
Jelly text effect
Glow text effect
Text outline


0 comments:
Post a Comment