Ice text effect
This Photoshop tutorial will teach you how to create an ice text effect. This tutorial is similar to the flame text tutorial and will require using various filter and blending options.
Ice text effect
Step 1
Create a new Photoshop document with 640 x 480 dimensions.
Using the paint bucket tool fill the background layer black.
Select the text tool and type your message on the stage. I used impact font type with white colour, but you can use whatever you wish.
Step 2
Rotate the canvas clockwise 90 degree by selecting Image > Rotate Canvas > 90 CW.
Select Filter > Stylize > Wind. If a message box appears asking to rasterize type, click ok. Add the following options and click ok.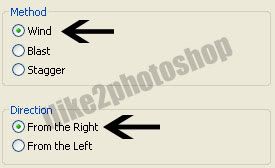
Return the canvas to the normal position by selecting Image > Rotate Canvas > 90 CWW.
Step 3
Select Filter > Pixelate > Facet and then select Layer > New Adjustment Layer > Hue/Saturation and click ok. Add the following settings:
**Make sure colorize is selected.
Step 4
Select your text layer and then Layer > Layer style > Blending Options. Add the following setting for Bevel and emboss: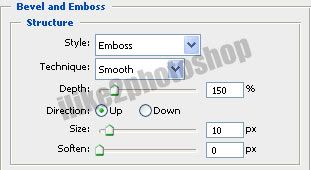
And then add the following for outer gloss: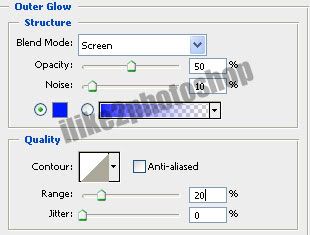
You should now have an ice text effect.


1 comments:
thx soooo much...i made it for my blog header...woot
Post a Comment