Showing posts with label Photo retouch. Show all posts

Tuesday, 30 June 2009

Colour a black and white image

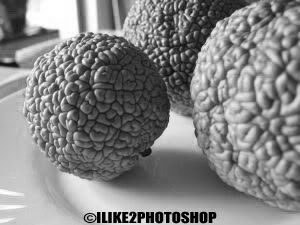
In this Photoshop tutorial you will learn how to colour a black and white image. This process involves using the brush tool to paint over the areas where you want colour. If you were to do this, the detailing in the image would disappear. To keep the detail you need to apply the colour blending option. I have used a free stock image of a pomegranate which is available from: www.sxc.hu

Colour a black and white image

Step 1

Open your black and white image in Photoshop.
Set the image mode to RGB colour by selecting Image > Mode > RGB colour. This will allow you to paint colour on your black and white image.


Step 2

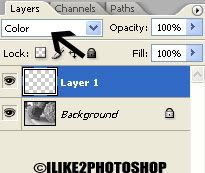
Insert a new layer Ctrl + Shift + N and then change the blending option to colour. This will maintain the detail when you paint colour to your image.


Step 3

Select the brush tool with an appropriate brush size and paint over the areas where you want colour. I have used #35610f colour but you can use whatever colour you wish.


You should now have colour on your black and white image. If you wish to fill the whole image with colour, simply change the colour of the brush and paint the rest of the image.
Wednesday, 17 June 2009

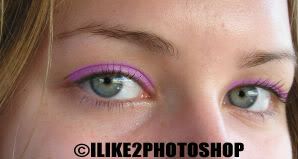
Eye shadow in Photoshop

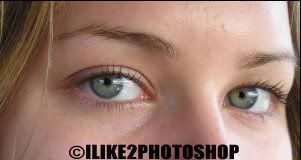
This Photoshop tutorial will teach you how to add eye shadow in to an image. You need to use the paint brush tool for this effect. I have used a free stock image of a woman which is available from: www.sxc.hu

Add eye shadow

Step 1

Open an image in Photoshop.


Step 2

Insert a new layer by selecting Ctrl + Shift + N.
Select the brush tool with an appropriate brush size and choose the colour you wish to use for the eye shadow. I have used #c64efd colour but you can use whatever colour you wish.
Change the brush opacity to 40%.


Step 3

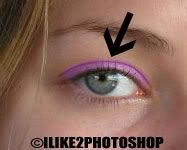
Paint over the areas where you want eye shadows like below. If your eye shadow colour is too light, you can paint another layer on top of your current layer.


Step 4 - optional

Select the smudge tool and blend in the eye shadow colour by clicking and dragging the mouse.


You should now be able to add eye shadow colour.


Related Tutorials
Change eye colour
Black eye effect

Friday, 29 May 2009

Increase nose size

This Photoshop tutorial will teach you how to make the size of the nose larger. You need to use the free transform and the smudge tool for this tutorial. I have used a free stock image of a woman which is available from: www.sxc.hu

Increase nose size

Step 1

Open an image in Photoshop.


Step 2

Take the lasso tool and make a rough selection around the nose areas like below:


Step 3

Copy the selection into a new layer by selecting Ctrl + J.
Select the free transform tool Ctrl + T and drag the handles to increase the size of the nose. You can make your new nose as large as you wish.


Step 4

You have probably noticed the excess skin around the nose area. Take the eraser tool and remove some of the excess skin. It may helpful if you hide background layer or even lower the opacity of the layer, to give you an idea of how much skin needs to be removed.


Step 5

Select the Smudge tool with an appropriate brush size. Click and drag around the edges of the nose to blend the colour. Now select the blur tool and again drag around the edges to blend the colours. Try to be sparse when using the blur tool as using too much blur can cause your image to look odd.


You should now have a bigger nose.


Related Tutorials
Change colour of hair
Whiter teeth
Darker skin colour
Add lipstick

Tuesday, 26 May 2009

Remove teeth from image

This Photoshop tutorial will teach you how to remove teeth from an image. You will need to use the clone stamp tool for this tutorial. I have used a free stock image of a mouth which is available from: www.sxc.hu

Remove teeth from image

Step 1

Open an image in Photoshop. Use an image where you can see areas inside the mouth.


Step 2

Zoom in on your image using the Zoom Tool (Z) and look for a dark areas inside the mouth where you can take a sample from.


Step 3

Select the Clone Stamp Tool with an appropriate brush size.
Hold down the Alt key and click the left mouse button to take a sample.
Now carefully paint over the areas of tooth, since the sample area is so small you will need to keep retaking samples using the Alt Key.


You will eventually get an image that looks something like below:


Related tutorial
Whiter teeth

Vampire teeth

Ruby lips

Add lipstick

Friday, 15 May 2009

Add lipstick in Photoshop

This tutorial will show you how to add lipstick to an image in Photoshop. This effect is useful if the man/woman in your image has no lipstick or if you want to change the shade of the lipstick. I have used a free stock image of lip available at: www.sxc.hu

Add lipstick in Photoshop

Step 1

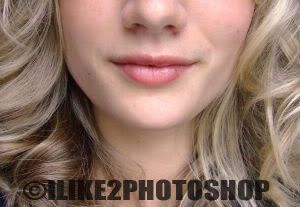
Open the image you wish to add lipstick in Photoshop.

Photobucket


Step 2

Create a new layer Ctrl + Shift + N.
Select the brush tool with an appropriate size. I have used a 7px diameter for my brush, but you can experiment your brush size. Change the brush opacity to 25%.

Photobucket


Step 3

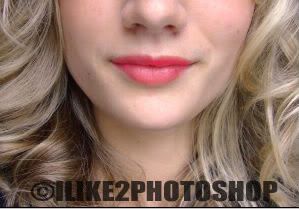
Select the foreground colour palette and choose a colour for the lips. I have used # f0214d colour, but you could select a darker colour if you wish. This is because the opacity of the brush is to low that a dark colour will appear light. Now carefully paint over the areas of lips with the brush tool. If you make a mistake you can use the eraser tool.

Your image should something like below:

Photobucket


Related Tutorials
Whiter teeth
Ruby red lips

Saturday, 14 March 2009

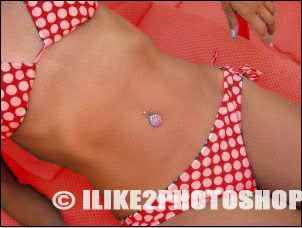
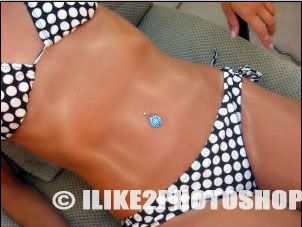
Shiny skin effect

This Photoshop tutorial will teach you how to create a shiny skin effect. This gives the effect of skin being shiny. This tutorial uses the plastic wrap filter and uses quick masks to the make selections. I have used a free stock image of a woman which is available at: www.sxc.hu

Shiny skin effect

Step 1

Open an image with skin exposed in Photoshop.

Photobucket

Step 2

Reset the foreground and background colours by pressing the “D” key.
Now the select the brush tool with an appropriate brush size and hit “Q” to enter quick mask mode. If you don’t know how to use quick masks checkout the quick masks tutorial.
Paint over all the areas where you don’t want the shiny effect. Your image should look something like below:


Photobucket

If you make a mistake you can use the eraser tool.

Step 3

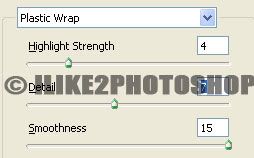
Hit “Q” again to exit quick mask mode and you should notice a selection around the skin area. Now select Filter > Artistic > Plastic wrap.
I used the following settings: Highlight strength = 4, Detail = 7 and Smoothness = 15. You can experiment with the various settings. Then click ok.

Photobucket

Step 4

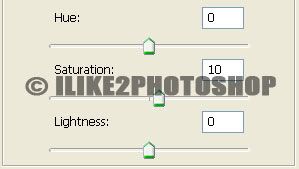
To bring out the shine select Image > Adjustment > Hue/saturation. Give the value of 10 for the saturation. Again you can experiment with the settings. Then click ok and select Ctrl + D to deselect the selection.

Photobucket

You should now have a shiny skin effect.

Photobucket


Related tutorials
Sun tan in Photoshop
Increase muscle size
Add tattoo to image

Tuesday, 13 January 2009

Change colour of car rims

This Photoshop tutorial will change the colour of car rims. This effect is great if you don’t like the colour of your rims. You can change the colour to whatever you wish. I used a free stock image of car which is available at: www.sxc.hu

Change colour of car rims

Step 1

Open an image of a car in Photoshop.

Step 2

Create a new layer Ctrl + Shift + N.
Select the Elliptical marquee tool and make a selection around your rim. You may find it easier using the pen tool.


Step 3

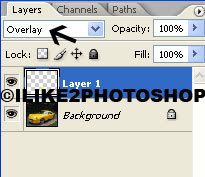
Select the bucket tool and fill in your selected area. I used #f2fc7e colour, but you can use whatever colour you wish. Now set the blending option to overlay. Repeat this for the other wheel.


You should now have some nice coloured rims.


If you want darker rims, set the blending option to colour.


Or why be adventurous and choose an outrageous colour.


Related tutorials
Change colour of any car
Tint car window
Open car window
Undercar lighting

Saturday, 10 January 2009

Sun tan in Photoshop

This Photoshop tutorial will teach you how to create a sun tan effect in Photoshop. This effect uses the quick mask tool and the adjustment curves. I have used a free stock image from www.sxc.hu. You can also create a similar effect with the darker skin tutorial.

Sun tan in Photoshop


Step 1

Open an image in Photoshop.


Step 2

Select the paint brush tool with an appropriate brush size. Then hit Q to enter the quick mask mode. Now carefully paint the areas of the image where you want the sun tan to be, like below:


The areas painted should appear in a red colour. If you make a mistake you can use the eraser tool.


Step 3

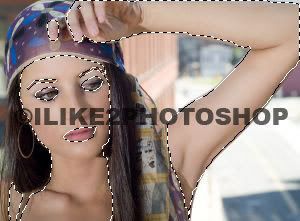
Now exit quick mask mode by hitting the Q key again. Then choose Select > Inverse and your image should look like below:


Step 4

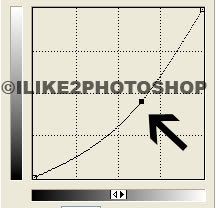
Select Ctrl + J to copy the selection to a new layer. Now Select Image > Adjustment > Curves. Drag the curve from the centre to the right slightly like below. If you want a darker tan you can move the curve further to the right.


You should now have a sun tan.


Related tutorials
Darker skin colour
Change hair shade/tone
Change colour of hair
Whiter teeth

Saturday, 11 October 2008

Undercar lighting in Photoshop

This Photoshop tutorial will teach you how to create undercar lighting. This gives the effect of coloured light, which is underneath the car. I have used a free stock image of a car which is available at: www.sxc.hu.

Undercar lighting in Photoshop

Step 1


Open an image of a car in Photoshop. Using an image of a car in darker background (night time) is particularly effective, but an image in a lighter background is still acceptable.

Step 2

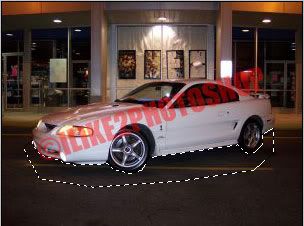
Select the polygon lasso tool and make a selection around the underneath of the car. You image should look something like below:


Step 3

Select Shift + Ctrl + N to create a new layer. And use the paint bucket tool to fill in your selected area. I used #4549f8 colour, but you can use whatever colour you wish.

And now choose Select > Feather give a 5 pixel feather radius and click ok.
Choose Select > Inverse and hit the delete key 4 times. This soften up the edges of the filled area. And deselect the image by selecting Ctrl + D. You image should look like below:


Step 4

I lower the opacity to 60%, but you can leave your image as it is, if you wish.


You should now have a car with under lighting.


Related tutorials
Add lights to any car
Tint car window
Change colour of any car

Monday, 15 September 2008

Add lights to any car

This Photoshop tutorial will teach you how to turn on headlight to any car. This effect is very quick only requires the lens flare filter. I have used a free stock image of a car which is available at: www.sxc.hu

Add lights to any car

Step 1


Open an image in Photoshop you wish to add light too. It’s best to use an image which is slightly dark as it is unlucky for a car to have lights on in the day time.


Step 2

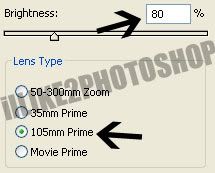
Select Filter > Render > Len Flare. Now move the flare center to the centre of your headlights. I used the following options below: Brightness = 80% and Lens type = 105mm prime but you experiment with the settings. If you want brighter light increase the brightness using the slider.


Now repeat this step for the other headlight.


You should now have lights on your car.
Check out this tutorial to tint a car window.

Wednesday, 10 September 2008

Tint car window

This Photoshop tutorial will teach you how to tint a car window. This will give the effect of a slightly darker window colour. This effect is very simple and requires using the quick mask and paint bucket tools. I have used a free stock image of a car which is available at: www.sxc.hu

Tint car window

Step 1


Open an image in Photoshop.


And insert a new layer by selecting Ctrl + Shift + N then click ok.

Step 2

Select a paint brush with an appropriate size and press the Q key to enter quick mask mode. Now paint over the areas where you do not want the tint the window. This would be most of the image. If you make a mistake you can use the eraser tool. Your image should look something like below:


**You could alternatively use the lasso tool for this step if you wish.

Step 3

Now exit the quick mask mode by pressing Q. And then select the paint bucket tool with a black foreground colour and fill your selected area.


Step 4

Now change the blending option to luminosity and the opacity to 50%. You can experiment with various settings if you wish. You should now have tinted car windows.


Why not give your car windows a different coloured tint. Here I used the blue colour with opacity at 15%. To change the colour of any car checkout this tutorial.

Wednesday, 27 August 2008

Darker skin colour

This Photoshop tutorial will teach you how to darken skin colour. This effect is very simple and can also be used to create any skin colour. For this tutorial I have used a free stock image of a man which is available at:www.sxc.hu

Darker skin colour

Step 1

Open an image in Photoshop.


Step 2

Select Layer > New > Layer and click ok to create a new layer. Choose a dark foreground colour I used #cf8b54, but you can use whatever you wish. Now using the paint bucket tool fill in the new layer with your colour.

Step 3

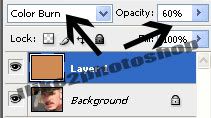
Change the blending mode to color burn and the opacity to 50%. If you find that the colour is not to your liking, you can easily adjust the opacity or even a different foreground colour.


Step 4

Select the eraser tool with a white foreground colour and eraser the area of your image which you do not want to darker. This would be most of the image for example: eyes, lips, background, clothing etc. You should start to notice your image standing out. If you make a mistake select your chosen foreground colour and paint over you mistake.


You should now have a darker skin colour.

Sunday, 24 August 2008

Change hair shade/tone

This Photoshop tutorial will teach you how to change hair shade/tone. You can use this effect to make your hair slightly lighter or darker. This effect is similar to the change colour of hair tutorial. For this tutorial I have used a free stock image of a woman which is available at: www.sxc.hu

Change hair shade/tone

Step 1

Open an image in Photoshop.

Step 2

Select the brush tool with an appropriate brush size. And select the Q key to enter quick mask mode. Now paint over the areas where you don’t want to change the hair shade/tone, like below:


If you make a mistake you can use the eraser tool.

Step 3

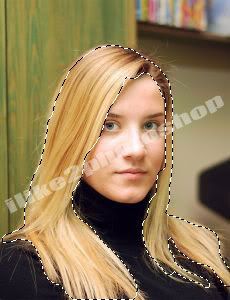
Now exit quick mask mode by selecting Q and you image should be selected like below:


Step 4

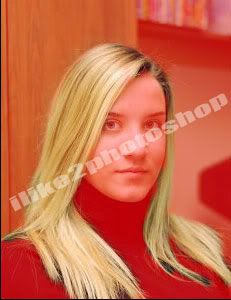
Select Image > Adjustment > Curves. You now change the preset dropdown menu to lighter or darker. Or you could manually alter the curves to your liking. Using the preset gives a more natural look. In this image i used the lighter preset.


And this is the darker preset.


You may notice a slight change in the shade/tone of the hair. If you want a dramatic change of shade/tone i recommend changing the curves setting to your liking.

  COPYRIGHT © 2010 · ILIKE2PHOTOSHOP · Theme by Ourblogtemplates

Back to TOP