Add image to text
This Photoshop tutorial will show you how to add an image to text. This effect is very easy and creates a nice result. For this tutorial I have used a free stock image of a hotdog which is available at:www.sxc.hu
Add image to text
Step 1
Open a new Photoshop document with the default Photoshop size.
Select the text tool (t) type your text on the canvas. I am using an image of a hotdog so will type “Hotdog” on the canvas. You type the name of whatever image you have.
I have used crisp for the anti-aliasing method to give it a smoother edge. You can also use the free transform (ctrl + t) to stretch your text vertically.
Step 2
Open the image you wish to use in Photoshop.
Choose Select > All then Edit > Copy and now paste your image onto your text by choosing your select text and selecting Edit > Paste.
Your image should now be on top of your text.
Step 3
On the layers panel right click on “Layer 1” and select Create clipping mask. Your layers panel should look like below: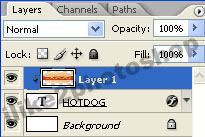
You should notice a little downward arrow on layer 1.
Step 4
On the layers panel again right click on your text layer and select blending options.
Check the Drop shadow and check the stroke. You can choose whatever colour you want for the stroke.
You should now have an image inside text.


1 comments:
This is awesome :) Thanks!
Post a Comment