Vignetting an image in Photoshop
This Photoshop tutorial will teach you how vignette an image. Vignetting is the process of causing the edges of an image to be darker/lighter than the centre of the image. This creates a nice effect and is quick to achieve. For this tutorial I have used a free stock image which is available at:www.sxc.hu
Vignetting an image
Step 1
Open an image you wish to vignette in Photoshop.
Step 2
Select Filter > Distort > Lens correction. I used the following settings: Amount = -82, Midpoint = 0, but you can experiment with the various settings depending on what kind of image you have. These settings create darker edges around the image. To create lighter edges you would use the opposite settings.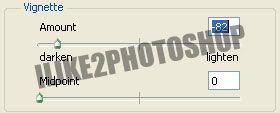
This is the darken image.
This is the lighten image.
You should now be able to vignette an image.


0 comments:
Post a Comment