Create Honeycomb texture
In this tutorial you will learn how to create a honeycomb texture. The honeycomb texture looks like a bee’s structure for holding wax. This tutorial requires using various filters and the gradient tool.
Honeycomb texture effect
Step 1
Open a new Photoshop document with the size 640 x 480 dimensions.
Set the foreground colour to #000000 and the background colour to #ecea26 as shown below:
Step 2
Select the gradient tool with the Radial gradient and the foreground to background gradient and drag a pattern on the canvas like below: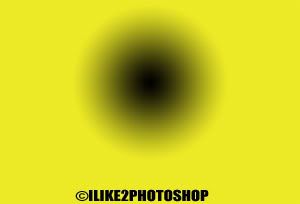
Step 3
Select Filter > Texture > Stained Glass and add the following settings and click ok:
- Cell Size = 100
- Border Thickness = 4
- Light Intensity = 3
Step 4
Select Filter > Artistic > Poster Edge and add the following setting then click ok.
- Edge Thickness = 1
- Edge Intensity = 1
- Poterization = 5
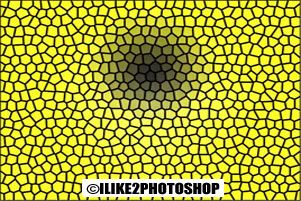
You should now have a honeycomb texture.


1 comments:
wow this is very informative thanks!
Post a Comment