Create a depth of field
In this tutorial you will learn how to create a depth of field in your image. Depth of field is when there is a graduation transition between the sharpness and un-sharpness of an image. So the front of an image will be in focus while the back will not be in focus. I have used a free stock image of oranges which is available from: www.sxu.hu
Create a depth of field
Step 1
Open an image in Photoshop.
Duplicate the layer by selecting Ctrl + J. 
Step 2
Add a box blur to your image by selecting Filter > Blur > Box Blur. Select the radius of 8 – 9 pixels depending on the size of your image. If you have a smaller image you may wish to choose a smaller radius size. The ‘Box Blur’ blurs an image based on the colour values of the neighbouring pixels. You should now have a blurry image like below:
Step 3
Select Layer > Layer Mask > Reveal All to add a layer mask to your image. Now reset the colour palette by pressing the ‘D’ key. Select the brush tool with an appropriate size and the opacity at 100%. Paint away the foreground areas where you want the image to stay in focus. Below are the areas of the image I will paint: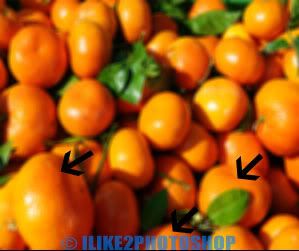
Step 4
Once you have completed the step above. Lower the opacity of the brush to 50% and paint a small portion of areas behind the areas you painted in the previous step. This builds up a gradually effect of depth in the image, so the foreground is in focus and the background is blurred.
You should have a depth of field in your image. Now if you compare the original image with your currently created image you should notice the foreground area is in focus while the background is blurred.


1 comments:
I have to try these steps at my free time. But thanks a lot for providing the tricks that I tried to acquire for some days. Thanks
Post a Comment