Electric text effect
This Photoshop tutorial will teach you how to create an electric text effect. This effect is very easy and create a nice effect.
Electric text effect
Step 1
Create a new Photoshop document with 640 x 480 dimensions.
Using the paint bucket tool fill the background layer black.
Select the text tool and type your message on the stage. I used Arial black font type with white colour, but you can use whatever you wish.
Step 2
Duplicate the layer by selecting Ctrl + J.
Select Filter > Stylize > Wind. If a message box appears asking to rasterize type click ok.
Choose the following options then click ok.
Select Ctrl + F to repeat this filter effect.
Step 3
Select Filter > Stylize > Wind, but this time select from the left instead of right.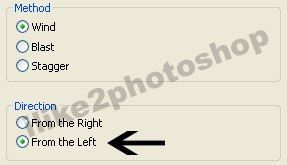
Again select Ctrl + F to repeat this filter effect.
Step 4
Select Image > Rotate Canvas > 90CW then select Filter > Stylize > Wind choose from the left and click ok. And select Ctrl + F to repeat this filter effect.
Again select Filter > Stylize > Wind choose from the right and click ok. And select Ctrl + F to repeat this filter effect.
Step 5
Rotate the canvas back to the original position by selecting Image > Rotate Canvas > 90CWW.
Select Layer > Layer Style > Blending option choose colour overlay. I used #4248b3 for the colour, but you can experiment with the various settings.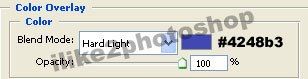
Step 6
Move the original text layer on top of the duplicate one.
You should now have an electric text effect.


0 comments:
Post a Comment