Light beam text effect
This Photoshop tutorial will teach you how to create a light beam text effect. This tutorial is similar to the ice text effect tutorial and require a variety of different filters.
Light beam text effect
Step 1
Create a new Photoshop document with 640 x 480 dimensions.
Using the paint bucket tool fill the background layer black.
Select the horizontal type mask tool and type your message on the stage. You should notice the red background when you type your message. I used impact font, but you can use whatever font you wish. Your message should have a selection like below:
Step 2
Select whatever colour you wish I used #00ff00. And then using the paint bucket tool fill in your selection.
Step 3
Select Filter > Blur > Radial Blur. And use the following setting: Amount = 100, blur method = zoom and quality = best and click ok.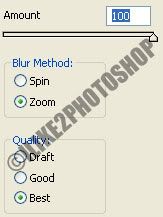
Apply the filter again by selecting Ctrl + F. And now choose Select > Feather give the feather radius 2 pixels. And then Choose Select > Blur > Gaussian Blur give the radius 1 pixel.
Step 4
Now chose Select > Inverse.
Select Filter > Blur > Radial Blur and give the same settings as step 3 then click ok.
Apply the filter three times by selecting Ctrl + F three times.
Step 5
Choose Select > Inverse and then Ctrl + J to duplicate the layer.
Now Select > Layer > Layer Style > Blending Options. Set the blend mode to screen. And check Drop shadow and set the blend mode to colour burn.
You should now have a beam light effect.
Related tutorials
Ice text effect
Electric text effect
Fire text effect
Glass text effect


0 comments:
Post a Comment