Showing posts with label Text effect. Show all posts

Tuesday, 24 November 2009

3D text effect part 2

I previously created a 3D text effect tutorial in Photoshop. This time I will created another kind of 3D text effect which uses the wind filter to the 3D effect instead of duplicating the text layers.


3D text effect part 2

Step 1

Create a new Photoshop document with 640 x 480 dimensions. Then select the paint bucket tool with black colour and fill the background layer with this colour. Now select the text tool with white colour and type your message on the canvas. I have used Tahoma font type with bold font style, but you can use whatever font you wish.



Step 2

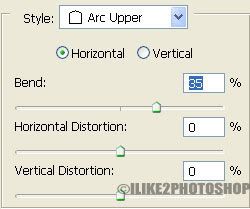
Still with the text tool selected. Choose the ‘Create Wrapped Text’ button, and then select the Arc upper style as shown below. I have set my bend to 35%.


Step 3

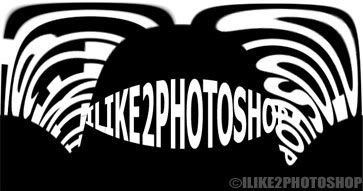
Duplicate the text layer Ctrl + J. Then apply the polar coordinate by selecting Filter > Distort > polar coordinate. If you receive a message about rasterising the type, click ok. Afterward choose the option ‘Polar to Rectangular’ and click ok. You should get the following pattern below.


Step 4

Rotate the canvas by selecting Image > Rotate Canvas > 90CW.
Apply the wind filter by selecting Filter > Style > Wind. Choose wind for the method and from the left for the direction, and click ok. Now repeat this effect about 5 – 6 times by hitting Ctrl + F.


Step 5

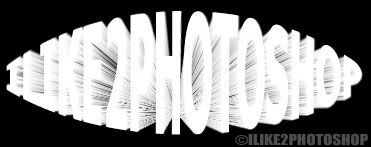
Rotate the canvas back into position by selecting Image > Rotate Canvas > 90CCW, and selecting Filter > Distort > Polar Coordinates then choose the opposite option. You should now have an effect like below.


Step 6

On the layer panel, drag the original text layer on top of the modified text layer. Then right click and select ‘Blending Options’ on the drop down menu. Check the ‘Gradient Overlay’ styles and choose a colour of your liking. I have gone for a two tones of red. Next check the ‘Outer Glow’ and set the spread to 16%.

Thursday, 12 November 2009

Spiral text effect in Photoshop

In this tutorial you will learn how to create a spiral text effect in Photoshop. You need to use the Custom shape tool for this tutorial which can be found on the tool box. This tutorial is similar to the text on the path tutorial.


Spiral text effect in Photoshop

Step 1

Open a new Photoshop document with the size 640 x 480. On the tool bar select the custom shape tool as shown below. The Custom shape tool is normally below the text tool.


Step 2

On the menu bar at the top of the Photoshop document select the ‘Shape’ drop down menu. Then select the more icon button and select ‘All’. If receive a message asking you to load all the shape, click ok.


Step 3

Locate the Custom shape called ‘Spiral’ and make sure the paths buttons is turned on.


Step 4

Now drag a spiral shape on the canvas as shown below, you can make your spiral shape as large or as little as you wish.


Step 5

Select the text tool and position the cursor over the spiral and type your message on the spiral.


Once, you have finished typing your message select Ctrl + H to remove the text path. You should have a spiral text effect.

Tuesday, 1 September 2009

Wood text effect

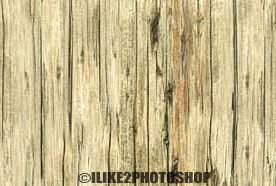
In this tutorial you will learn how to create a wood text effect in Photoshop. The wood effect is created by adding a pattern overlay on top of the text. You will need a wood texture for this tutorial. A list of free Photoshop texture can be found here.


Wood text effect

Step 1

Open a wooden texture in Photoshop.
Select Edit > Define Pattern then choose a name and click ok. This adds the texture to the library of patterns.


Step 2

Create a new Photoshop documents with the size 640 x 480. Select the text tool and type your message on the canvas like below. I have used impact font type, but you can use whatever font you wish. The wood text effect will work particularly well with chucky text.


Step 3

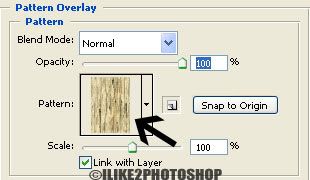
Select Layer > Layer Styles > Blending options. Check the pattern overlay checkbox then click the pattern drop down menu and select your wood texture.


Step 4

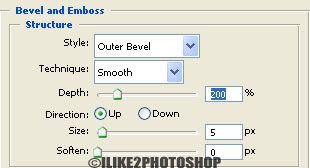
Now check the ‘Bevel and Emboss’ checkbox. Change the style to Outer bevel and the depth to 200% like below:


You should now have a wood text effect.

Thursday, 16 July 2009

3D text effect

This Photoshop tutorial will teach you how to create 3D text effect. This effect requires duplicating and moving several text layers to create the three dimensional effect.

3D text effect

Step 1

Create a new Photoshop document with 640 x 480 dimensions.
Select the text tool and type your message on the canvas. I used Impact font type, but you can use whatever font you wish. For this text effect, the blockier the font type the better.


Step 2

Hold down Ctrl + Alt and select down and right on the keyboard about 15 – 20 times depending on the size of your text. You can also select: down & left, up & right or up & left on the key board if you wish.

You should notice a lot of new layers in your layers panel and your text should look like below:


Step 3

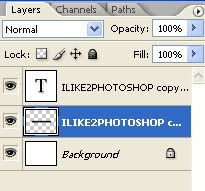
On the layers panel hold down the Ctrl key and select all of your new layers apart from the top layer and select Ctrl + E to merge all the layers together. Your layer panel should look like below:


Step 4

On the layers panel select the top layer and right click and select Blending options. Then give your text some colour by checking either the colour overlay or the gradient overlay. I have selected the gradient overlay with an orange and yellow gradient.

Now check the Stroke style and give the size of 2 or 3 pixels and the colour black then click ok.


Step 5

On the layers panel angle select the merged layer then right click and select Blending options. Now check the drop shadow style with the default settings and click ok.


You should now have a 3D text effect.


Related tutorials
Jelly text effect
Glow text effect
Text outline

Saturday, 4 July 2009

Add text to a path

In this tutorial you will learn how to add text to a path. This process is very simply and requires drawing the path and then typing text on it. You only need three steps for this tutorial.

Add text to a path

Step 1

Open a new Photoshop documents with the 640 x 480 dimensions.
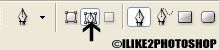
Select the pen tool from the tool bar and then select the option Paths on the tool options bars like below.


Step 2

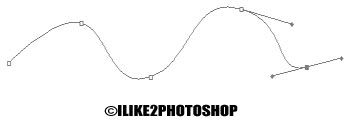
Draw your path on the canvas by clicking different points and dragging the mouse either up or down to create the curve. You can create whatever kind of curve you wish.


Step 3

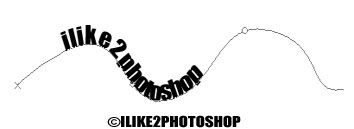
Now select the text tool with whatever font you wish then click on the path and type message. Make sure you have selected Horizontal type tool.


You should now have text on a path.


Related tutorials
Perspective text effect
Text outline effect
Glow text effect

Wednesday, 1 July 2009

Perspective text effect

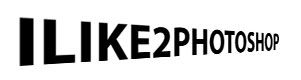
In this Photoshop tutorial you will learn how to create a perspective text effect. Perspective text is when the text appears smaller in the distance. For this effect you need to rasterize the layer as you cannot perform transforms on a normal text layer.

Perspective text effect

Step 1

Open a new Photoshop document with 640 x 480 dimensions.
Select your text tool and type your message on the stage. I have used Myriad Pro font type, but you can use whatever font type you wish.


Step 2

Choose Layer > Rasterize > Type. This will allow you to perform the perspective transform to the text.


Step 3

Choose Edit > Transform > Perspective. Select the bottom right handle and drag it upwards and you should notice the text message appear smaller in the distance. You can create as big or small perspective effect as you wish.


Step 4 – optional

If you wish to add colour you can add Layer > Layer Style > Blending Option. Check the colour overlay box and change the colour to whatever you wish.


You now have a persepective text effect

Friday, 19 June 2009

Text outline effect

This Photoshop tutorial will teach you how to create a simple text outline effect. You are required to use the stroke blending option for this effect.

Text outline effect

Step 1

Open a new Photoshop document with the size 640 x 480.
Select the text tool with a black colour and type your message on canvas. I have used impact font type, but you can use whatever font you wish.


Step 2

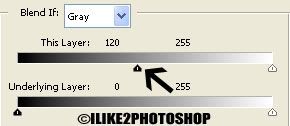
Select Layer > Layer Styles > Blending options. Then drag the “this layer” of the Blend If section, until your text on the canvas disappears.


Step 3

Now select the Stroke blending option and add the following settings:

Size: 3px
Position: Outside
Blend Mode: Normal
Opacity: 100%
Fill Type: Colour
Colour: # 1663ef (Choose whatever colour you wish)


You should now have text outline effect.


Related Tutorials
Glow text effect
Ice text effect
Jelly text effect
Gold text effect

Thursday, 11 June 2009

Glow text effect

This Photoshop tutorial will teach you how to create a glow text effect. The outer glow and stroke blending options are needed for this tutorial.

Glow text effect

Step 1

Open a new Photoshop document with 640 x 480 dimensions.
Select the paint bucket tool and fill the background in a black colour. Then select the text tool and type your message on the stage. I have used Myriad pro font type with white colour, but you can use whatever font and colour you wish.


Step 2

Select Layer > Layer Style > Blending options. Check the outer glow checkbox and add the following settings.
For the structure: the blend mode is screen, the opacity is 100% and the colour is #D52603.
For the elements: the techniques: softer, the spread is 8% and the size is 7px.


Step 3

Now check the stroke checkbox and add the following settings.
For the structure: the size is 2, the position is center, the opacity is 100% and the colour is #851212.


**Depending on your size of your text, you may need to adjust the glow and stroke blending options.


You should now have a glow text effect.


Related Tutorials
Jelly text effect
Gold text effect
Flame text effect

Monday, 22 December 2008

Jelly text effect

This Photoshop tutorial will teach you how to create a jelly text effect. This effect uses layer styles and blending options. You can abjust the various settings to your liking.

Jelly text effect

Step 1


Create a new Photoshop document with the default Photoshop size. Select the text tool and type your message on the stage. I used impact font with black colour, but you can use whatever colour you want.


Step 2

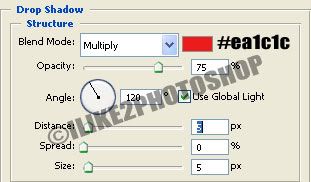
Select Layer > Layer style > Blending Options. Add the following settings for drop shadow below:


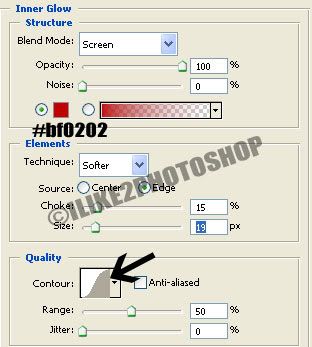
I used #ea1c1c colour. And then add the followings setting for inner glow:


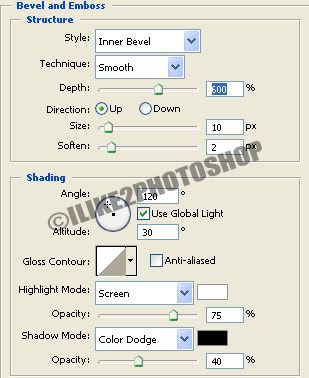
And then add the following settings for bevel and emboss:


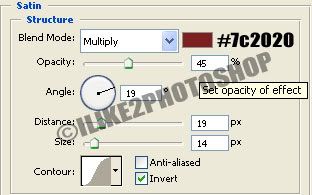
And then add the following settings for satin:


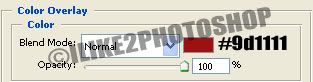
And finally add the following settings for colour overlay:


**I have used the #9d1111 colour and the opacity at 100%, but you can experiment with the various settings.

Step 3 – optional

You may notice your text lettering looking quite sharp around the edges.
Select the blur tool with an appropriate brush size and soften up the edges of your letters by painting over the edges.


You should now have a nice jelly text effect.

Related tutorials
Ice text effect
Flame text effect
Gold text effect
Glass text effect

Saturday, 27 September 2008

Light beam text effect

This Photoshop tutorial will teach you how to create a light beam text effect. This tutorial is similar to the ice text effect tutorial and require a variety of different filters.

Light beam text effect

Step 1


Create a new Photoshop document with 640 x 480 dimensions.
Using the paint bucket tool fill the background layer black.
Select the horizontal type mask tool and type your message on the stage. You should notice the red background when you type your message. I used impact font, but you can use whatever font you wish. Your message should have a selection like below:


Step 2

Select whatever colour you wish I used #00ff00. And then using the paint bucket tool fill in your selection.


Step 3

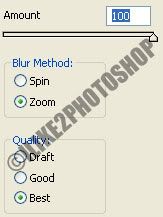
Select Filter > Blur > Radial Blur. And use the following setting: Amount = 100, blur method = zoom and quality = best and click ok.


Apply the filter again by selecting Ctrl + F. And now choose Select > Feather give the feather radius 2 pixels. And then Choose Select > Blur > Gaussian Blur give the radius 1 pixel.

Step 4

Now chose Select > Inverse.
Select Filter > Blur > Radial Blur and give the same settings as step 3 then click ok.
Apply the filter three times by selecting Ctrl + F three times.


Step 5

Choose Select > Inverse and then Ctrl + J to duplicate the layer.
Now Select > Layer > Layer Style > Blending Options. Set the blend mode to screen. And check Drop shadow and set the blend mode to colour burn.


You should now have a beam light effect.


Related tutorials
Ice text effect
Electric text effect
Fire text effect
Glass text effect

Sunday, 10 August 2008

Ice text effect

This Photoshop tutorial will teach you how to create an ice text effect. This tutorial is similar to the flame text tutorial and will require using various filter and blending options.

Ice text effect

Step 1

Create a new Photoshop document with 640 x 480 dimensions.
Using the paint bucket tool fill the background layer black.
Select the text tool and type your message on the stage. I used impact font type with white colour, but you can use whatever you wish.


Step 2

Rotate the canvas clockwise 90 degree by selecting Image > Rotate Canvas > 90 CW.
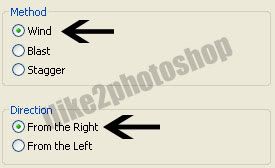
Select Filter > Stylize > Wind. If a message box appears asking to rasterize type, click ok. Add the following options and click ok.


Return the canvas to the normal position by selecting Image > Rotate Canvas > 90 CWW.

Step 3

Select Filter > Pixelate > Facet and then select Layer > New Adjustment Layer > Hue/Saturation and click ok. Add the following settings:


**Make sure colorize is selected.

Step 4

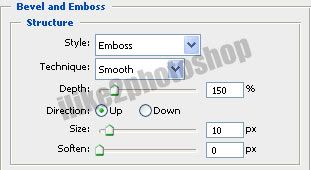
Select your text layer and then Layer > Layer style > Blending Options. Add the following setting for Bevel and emboss:


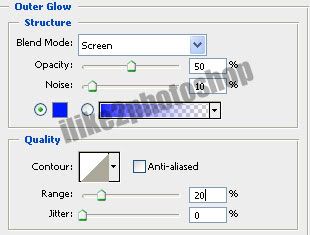
And then add the following for outer gloss:


You should now have an ice text effect.

Monday, 4 August 2008

Electric text effect

This Photoshop tutorial will teach you how to create an electric text effect. This effect is very easy and create a nice effect.

Electric text effect

Step 1


Create a new Photoshop document with 640 x 480 dimensions.
Using the paint bucket tool fill the background layer black.
Select the text tool and type your message on the stage. I used Arial black font type with white colour, but you can use whatever you wish.


Step 2

Duplicate the layer by selecting Ctrl + J.
Select Filter > Stylize > Wind. If a message box appears asking to rasterize type click ok.
Choose the following options then click ok.


Select Ctrl + F to repeat this filter effect.

Step 3

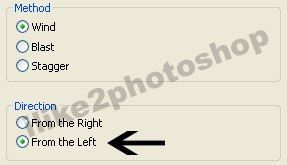
Select Filter > Stylize > Wind, but this time select from the left instead of right.


Again select Ctrl + F to repeat this filter effect.

Step 4

Select Image > Rotate Canvas > 90CW then select Filter > Stylize > Wind choose from the left and click ok. And select Ctrl + F to repeat this filter effect.

Again select Filter > Stylize > Wind choose from the right and click ok. And select Ctrl + F to repeat this filter effect.

Step 5

Rotate the canvas back to the original position by selecting Image > Rotate Canvas > 90CWW.

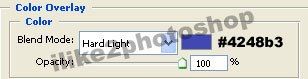
Select Layer > Layer Style > Blending option choose colour overlay. I used #4248b3 for the colour, but you can experiment with the various settings.


Step 6

Move the original text layer on top of the duplicate one.


You should now have an electric text effect.

  COPYRIGHT © 2010 · ILIKE2PHOTOSHOP · Theme by Ourblogtemplates

Back to TOP