Change colour of an object
In this tutorial you will learn how to change the colour of an object in Photoshop using the Adjustment layer. There are many different methods of changing the colour, but I will show you the simplest way. I have used a free stock image which is available from www.sxc.hu
Change colour of an object
Step 1
Open an image in Photoshop you wish to change the colour of. I have decided to change the colour of the apple in my image. You can use whatever kind of image you want, but make sure you use a coloured image.
Step 2
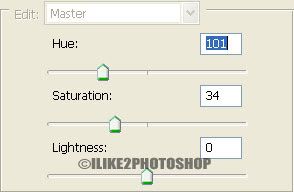
Create a new Adjustment layer by selecting Layer > New Adjustment layer > Hue/Saturation. Select the ‘Colorize’ box and then change the hue and saturation sliders to the colour you want to change, and click ok. I want to give the apple in my image, a green colour so have given the following settings below.
Step 3
Add a vector mask by selecting Layer > Vector Mask > Reveal All. Then reset the colour palette by pressing the ‘D’ key and paint over all the areas where you don’t want the green colour. If you make a mistake you can flip over the colour palette (X) and paint over the incorrect area.
You should now be able to change the colour of an object.

3 comments:
Thank you for the excellent tutorials, I will put everything into practice.
Thank you for teaching us how to use photoshop. I never had one yet but I will soon.
this is a great tutorial! short, clear and it makes life in a shop so much easier. thanks very much.
Post a Comment