Friday, 27 November 2009

Photoshop Easter egg – Merlin lives

In all versions of Photoshop there are various secret Easter eggs. It seems to be a tradition to include these Easter eggs. All the versions have a pop up window with a little wizard called ‘Merlin’.

To find this Easter egg you firstly need to open up Photoshop. Then hold down the Alt (Windows) or Options (Mac) key depending on what kind of computer you have. Now click on the little arrow button on the layers panel as shown below.


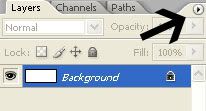
On the drop down menu select ‘Palette Option’ which is the last item on the menu.


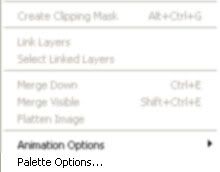
A pop up window should appear with a little wizard. You press the ‘Begone’ button for the window to close down.


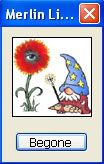
If you know any more Easter eggs, feel free to leave a comment below.

Tuesday, 24 November 2009

3D text effect part 2

I previously created a 3D text effect tutorial in Photoshop. This time I will created another kind of 3D text effect which uses the wind filter to the 3D effect instead of duplicating the text layers.


3D text effect part 2

Step 1

Create a new Photoshop document with 640 x 480 dimensions. Then select the paint bucket tool with black colour and fill the background layer with this colour. Now select the text tool with white colour and type your message on the canvas. I have used Tahoma font type with bold font style, but you can use whatever font you wish.


Step 2

Still with the text tool selected. Choose the ‘Create Wrapped Text’ button, and then select the Arc upper style as shown below. I have set my bend to 35%.


Step 3

Duplicate the text layer Ctrl + J. Then apply the polar coordinate by selecting Filter > Distort > polar coordinate. If you receive a message about rasterising the type, click ok. Afterward choose the option ‘Polar to Rectangular’ and click ok. You should get the following pattern below.


Step 4

Rotate the canvas by selecting Image > Rotate Canvas > 90CW.
Apply the wind filter by selecting Filter > Style > Wind. Choose wind for the method and from the left for the direction, and click ok. Now repeat this effect about 5 – 6 times by hitting Ctrl + F.


Step 5

Rotate the canvas back into position by selecting Image > Rotate Canvas > 90CCW, and selecting Filter > Distort > Polar Coordinates then choose the opposite option. You should now have an effect like below.


Step 6

On the layer panel, drag the original text layer on top of the modified text layer. Then right click and select ‘Blending Options’ on the drop down menu. Check the ‘Gradient Overlay’ styles and choose a colour of your liking. I have gone for a two tones of red. Next check the ‘Outer Glow’ and set the spread to 16%.

Thursday, 12 November 2009

Spiral text effect in Photoshop

In this tutorial you will learn how to create a spiral text effect in Photoshop. You need to use the Custom shape tool for this tutorial which can be found on the tool box. This tutorial is similar to the text on the path tutorial.


Spiral text effect in Photoshop

Step 1

Open a new Photoshop document with the size 640 x 480. On the tool bar select the custom shape tool as shown below. The Custom shape tool is normally below the text tool.


Step 2

On the menu bar at the top of the Photoshop document select the ‘Shape’ drop down menu. Then select the more icon button and select ‘All’. If receive a message asking you to load all the shape, click ok.


Step 3

Locate the Custom shape called ‘Spiral’ and make sure the paths buttons is turned on.


Step 4

Now drag a spiral shape on the canvas as shown below, you can make your spiral shape as large or as little as you wish.


Step 5

Select the text tool and position the cursor over the spiral and type your message on the spiral.


Once, you have finished typing your message select Ctrl + H to remove the text path. You should have a spiral text effect.

Monday, 9 November 2009

Coloured stencil effect

In this tutorial you will learn how to create a coloured stencil effect in Photoshop. You will need to use the threshold adjustment tool for this effect. I have used a free stock image which is available from sxc.hu.


Coloured stencil effect

Step 1

Open an image in Photoshop you wish to add the coloured stencil effect to. This effect will work best on a self portrait image. Duplicate the background layer by selecting Ctrl + J, and then reset the colour palette by pressing the ‘D’ key on the keyboard.


Step 2

Select Image > Adjustment > Threshold and give a threshold level of 131. You can experiment with the levels in your image as it may be different. The threshold adjustment represents an image as pure white or pure black, depending on the slider position. You will image something like below.


Step 3

Select the magic wand tool and select the white areas of the image and hit delete. Then using the paint bucket tool colour the empty spaces with your favourite colours. I have filled the background in #06965b colour in the face with various shades of red.


You should now have a coloured stencil effect.

  COPYRIGHT © 2010 · ILIKE2PHOTOSHOP · Theme by Ourblogtemplates

Back to TOP