3D text effect part 2
I previously created a 3D text effect tutorial in Photoshop. This time I will created another kind of 3D text effect which uses the wind filter to the 3D effect instead of duplicating the text layers.
3D text effect part 2
Step 1
Create a new Photoshop document with 640 x 480 dimensions. Then select the paint bucket tool with black colour and fill the background layer with this colour. Now select the text tool with white colour and type your message on the canvas. I have used Tahoma font type with bold font style, but you can use whatever font you wish.
Step 2
Still with the text tool selected. Choose the ‘Create Wrapped Text’ button, and then select the Arc upper style as shown below. I have set my bend to 35%.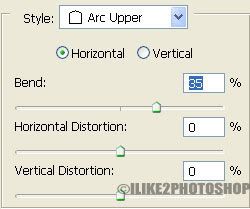
Step 3
Duplicate the text layer Ctrl + J. Then apply the polar coordinate by selecting Filter > Distort > polar coordinate. If you receive a message about rasterising the type, click ok. Afterward choose the option ‘Polar to Rectangular’ and click ok. You should get the following pattern below.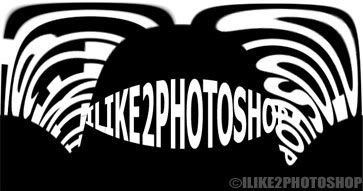
Step 4
Rotate the canvas by selecting Image > Rotate Canvas > 90CW.
Apply the wind filter by selecting Filter > Style > Wind. Choose wind for the method and from the left for the direction, and click ok. Now repeat this effect about 5 – 6 times by hitting Ctrl + F.
Step 5
Rotate the canvas back into position by selecting Image > Rotate Canvas > 90CCW, and selecting Filter > Distort > Polar Coordinates then choose the opposite option. You should now have an effect like below.
Step 6
On the layer panel, drag the original text layer on top of the modified text layer. Then right click and select ‘Blending Options’ on the drop down menu. Check the ‘Gradient Overlay’ styles and choose a colour of your liking. I have gone for a two tones of red. Next check the ‘Outer Glow’ and set the spread to 16%.


0 comments:
Post a Comment