Sunburst effect
In this tutorial you will learn how to create a sunburst effect using the gradient tool and various filters. A sunburst effect is when there are beams of colour coming from the centre of the image. For more information on gradients checkout the gradient tool tutorial at learn-Photoshop.
Sunburst effect
Step 1
Open a new Photoshop document with the size 640 x 480.
Reset the colour palette by pressing the ‘D’ key. Choose a foreground colour I have selected #e9d92a colour, but you can use whatever colour you wish.
Step 2
Select the gradient tool with the liner gradient option and the foreground to background gradient like below: 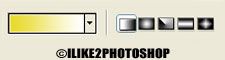
Step 3
Hold down the Shift key and drag a gradient starting from the bottom of the canvas to the top. Make sure you drag a large gradient, so your canvas will look like below: 
Step 4
Select Filter > Distort > Wave and add the following settings and click ok.
Number of generators = 15
Wavelength: Min = 34, Max = 43
Amplitude: Min = 15, Max = 104
Scale: Horiz = 100, Vert = 100
Type = Square
You should get the following pattern:
Step 5
Select Filter > Distort > Polar Coordinates. Ensure the ‘Rectangular to polar’ is selected and click ok. 
You should now have a sunburst effect.


0 comments:
Post a Comment