Saturday, 30 January 2010

Photoshop CS4 tip – Open tabs in windows

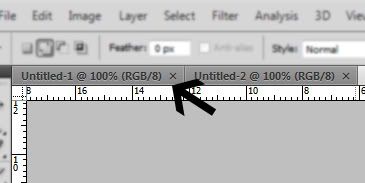
This is a Photoshop CS4 tip where you will learn how to open tabs in multiple windows. Currently when you open many documents in Photoshop they appear as tabs as shown in the image below.


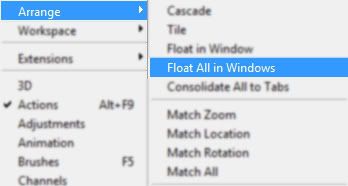
To open up the tabs in different windows is a straight forward process. Go to the menu bar and select Windows > Arrange > Float All in Windows. This will open all the tabs into separate windows.


You can also alternatively right click on the tab and select Move to New Window which will automatically make the tab appear in a new separate window. This is a convenient method of making one tab appear in a new window, but if you had more than one tab then I would suggest going through the menu bar.

Wednesday, 27 January 2010

Night vision effect in Photoshop

In this tutorial you will learn how to create a night vision effect in Photoshop using the hue and saturation adjustments, blur filter and the burn tool. The night vision effect in this tutorial gives the result of looking through night vision goggles. I have used a free stock image which can be found at sxc.hu.


Night vision effect in Photoshop

Step 1

Open an image in Photoshop. It’s best to use an image which contains some scenery such as buildings or landmarks.


Step 2

Duplicate the background layer by pressing Ctrl + J on the keyboard. Then select Image > Adjustment > Hue/Saturation. Check the Colorize box at the bottom of the dialog window and then give your image a green colour. I have used the following settings, but you can use whatever setting you wish. I have set the hue to 124, the saturation to 43 and the lightness to -36.


Step 3

Add some noise to your image by selecting Filter > Add Noise. I have only added a small amount of noise to my image. The amount I used is 10% and the distribution is uniform.


Step 4

Take the burn tool with the range at Midtones and the exposure at 64%. And paint around the edges of the image. Apply about 5 -6 layers of burn around the edges, so you get a slightly blacken colour.


You should now have a night vision effect.

Wednesday, 20 January 2010

10 free Photoshop Actions

This article contains ten Photoshop Actions you can download for free. Actions are basically recorded sequences of commands that have been saved, and can be used at a later stage.

To install actions, you drag the .atn file into the actions folder directory in Photoshop, or you can alternatively drag the .atn into the actions panel with the PS interface.

Polaroid GENERATOR V1


Action no.4-spooky portraits


Eye colour


Convert white to transparent


Vintage Photo


Photoshop Dream Blur Action


SkinTone set


Gum Bichromate Print


Skin Smoothing


Comics Photoshop action


Thursday, 14 January 2010

Change brush size in Photoshop

When you use the brush tool in Photoshop there is a quick way of increasing and decreasing the brush size without going through the brush menu. Normally when you want to change the brush size you would have to go through the brush options. (black triangle)


To change the size you drag the slider left or right to increase/decrease the size, or you can change the value from the input text field. Changing the hardness of the brush is the same changing the size of the brush.


A quicker method of changing the brush size would be to use shortcut keys. You would use the ‘[’ (left bracket) to decrease the size of the brush, and the ‘]’ (right bracket) to increase the size of the brush. If you want to decrease the edge hardness of the brush you would use ‘Shift + [’, and to increase you would use ‘Shift + ]’. The benefit of using shortcut keys is that you can see the brush change take place on the image instead of through the brush menu options.

Monday, 4 January 2010

Lined paper effect

In this tutorial you will learn how to create a lined paper effect in Photoshop using the pattern overlay presets. I have used the default Photoshop presets, but you can download custom presets from here if you wish.


Lined paper effect


Step 1

Open a new Photoshop document with the size 640 x 480 dimensions. Then select the Rectangle tool on the toolbar with the ‘shape layer’ options and drag a rectangle shape on the canvas like below. I have used a light grey colour foreground colour, but you can use a darker colour if you wish.


Step 2

On the menu bar select Layer > Layer Style > Blending Options then select the ‘Pattern Overlay’ checkbox. Now select the drop down menu from the pattern option, then select the menu option (black triangle) and choose the ‘Color paper’ option from the drop down menu as shown below.


Step 3

Select the preset called ‘Notebook’ as shown below, and then click ok.


You should now have a lined paper effect.

  COPYRIGHT © 2010 · ILIKE2PHOTOSHOP · Theme by Ourblogtemplates

Back to TOP